在玩 Cypress 的时候,上路第一步,先斩意中人 先得搞清楚 Cypress 的代码执行顺序到底是什么。
有些教程会推荐把 Cypress 的代码看作同步的来看待,不过个人强烈不推荐。这种建议在你刚开始写的时候也许能让事情变得简单一点点,然而一旦写到稍微复杂点的代码就会让人崩溃,所以如果要使用 Cypress,一定要好好弄懂 Cypress 的代码执行顺序 - 它的命令队列。
Cypress 命令
Cypress 命令及它的 command,包含 cy.get、.click、.should 等,都是通过 Command 类构造的,也包括自定义命令。
案例
先来看一段简单的 Cypress 代码:
cy.visit('http://localhost:3300/Queue-1');
cy.get('[data-test-id="test-btn"]').click();
cy.get('[data-test-id="test-ul"] li').should('have.length', 5);
如果我们将 Cypress 的代码看作同步代码,好像逻辑没什么问题,Cypress 先打开页面,然后点击对应的按钮,然后检查列表是否正确渲染。但如果稍微修改一下代码就会发现事情不简单:
cy.visit('http://localhost:3300/Queue-1');
let tag = 'start';
cy.get('[data-test-id="test-btn"]')
    .then(() => {
        tag = 'clicked';
    })
    .click();
console.log(tag);
cy.get('[data-test-id="test-ul"] li').should('have.length', 5);
tag = 'end';
console.log(tag);
log 是 start -> end。而如果 Cypress 代码是同步的则很显然 log 应该是 clicked -> end。
原理
而其实 Cypress 的命令如 click 、get 等等都是异步的,但 Cypress 在执行这些命令时,会将其放到任务队列中,任务队列我们可以通过 cy.queue 查看,如上的代码生成的队列如下:
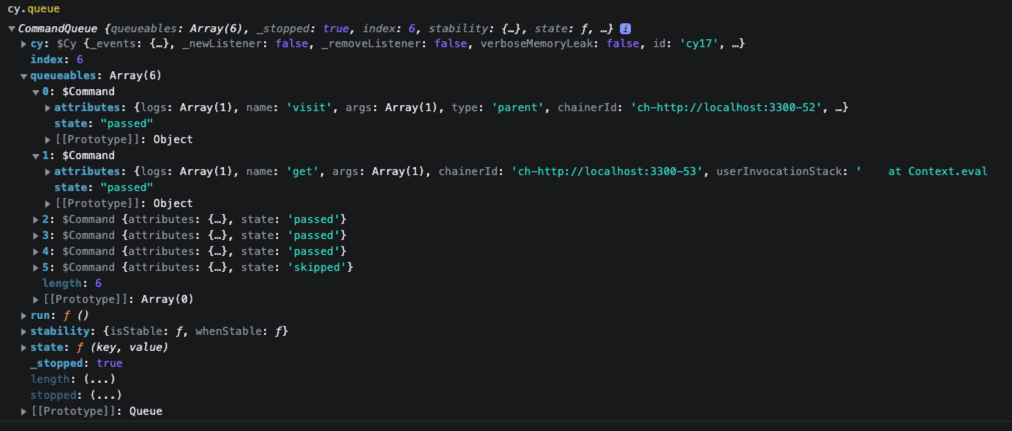
所有的命令都会被存储到 queueables 中,每个元素保存着命令的状态和属性。当 Cypress 在执行时会从队列中依次执行命令,当前一个命令完成后才会进入下一个命令,从而实现类似同步的效果。
所以解释下上述代码执行过程:
Cypress添加一个visit命令- 声明
tag为start Cypress依次添加get命令、then命令、click命令log tag为startCypress依次添加get命令、should命令tag修改为endlog tag为end- 开始依次执行任务:
visit->get->then->click->get->should
所以可以看到 queueables 中有 6 条命令。
then
在上面比较特殊的场景是 then 中的命令,Cypress 的 then 设计类似于 Promise,但并不等价,也不可以当作 Promise 来使用,比如 Promise.all 和 async-await 等。
cy.visit('http://localhost:3300/Queue-1');
cy.get('[data-test-id="test-btn"]').then(() => {
    cy.get('[data-test-id="test-ul"] li').should('not.exist');
    cy.get('[data-test-id="test-btn"]').click();
    cy.get('[data-test-id="test-ul"] li').should('have.length', 5);
    console.log(cy.queue.queueables.length);
});
cy.get('[data-test-id="test-ul"] li').should('have.length', 5);
console.log(cy.queue.queueables.length);
then 也是 Cypress 中的一个命令,当执行 then 命令时如果遇到新的 Cypress 命令 Cypress 将会将其插入到队列中对应的位置,如上代码会先打印出 5,然后等到 then 命令执行时再打印 11,但是 then 中的 should 命令将在最外层的 should 命令前执行。
所以上述代码的执行过程:
Cypress依次添加最外层的visit命令、get命令、then命令、get命令、should命令log打印cy.queue中的命令长度,此时长度为 5- 开始依次执行
visit命令、get命令、then命令 - 执行
then命令,此时Cypress会依次添加then中的get命令、should命令 等,但是添加时不是直接插入队尾,而是会插入到then命令后。 log打印cy.queue中的命令长度,此时长度为 11then命令完成后执行后续任务,由于then中的新任务插入,所以此时会从then中添加的get任务开始执行
源码解读
Cypress 中的所有命令执行的时候都会调用 enqueue:
cy.enqueue(
    $Command.create({
        name,
        args,
        type,
        chainerId: chainer.chainerId,
        userInvocationStack,
        fn: firstCall ? cyFn : chainerFn
    })
);
enqueue 的源码如下:
enqueue (command: $Command) {
    let nestedIndex = this.state('nestedIndex')

    if (_.isNumber(nestedIndex) && nestedIndex < this.length) {
      this.state('nestedIndex', (nestedIndex += 1))
    }
    const index = _.isNumber(nestedIndex) ? nestedIndex : this.length
    this.insert(index, command)
}
所以在执行 enqueue 时会回去当前的 nestedIndex,并在对应的位置进行插入,以上面的 demo 为例,then 中的命令开始插入时就会从 then 的位置开始插入,从而保障任务的执行顺序。
最后
总结一下,Cypress 中的命令在调用时会将命令插入队列,在队列执行时会依次执行命令,如果命令执行时添加新的命令就会将新的命令插入到当前命令的后方。